
Self Recording Video, what is it?
A self recording video is a video recording process in which the subject of the video is also the operator of the equipment recording the video. A self recording process can be used for a variety of video productions. One can self record a podcast, a video conference, a lecture, or an instructional/educational video. These are just a few of the possible self recording applications. Depending upon the equipment you are using, and the level of your expertise, self recording options can be applied to a limitless range of applications. Your ingenuity, as always, is boundless. Our self recording options are by no means exhaustive; however, they represent a range that will accommodate a variety of budgets and expertise.
Camera Recommendations for Self Recording Video
We recommend three cameras:
Smartphone
You have a camera in your pocket. Why not use it to self record? This is obviously the most convenient, and budget friendly camera option. In many respects, it is also the easiest to use. You likely already know how to use it. A few accessories will optimize your image exposure, and setup, to quickly begin self recording your video.
Canon EOS 80D DSLR Camera
The Canon EOS 80D DSLR Camera has the ability to record a much higher quality image than your smartphone. The versatility of the camera’s settings provide you greater control of the image exposure. This particular camera also has an attached LCD monitor that can rotate or flip to face you when you are standing in front of the camera. You can then use the monitor for framing and to see yourself when recording. The LCD Monitor is a touchscreen that can be used for quick and accurate focusing. The camera also includes a face detect auto focus feature that will maintain the focus of your face while recording. If you like to move around a little while recording, then this feature will be helpful to automatically maintain accurate focus. People with a little more expertise will also find this helpful if you are utilizing a shallow depth of field. One of the limitations of this camera is its maximum recording limit of 29 minutes. This is an inherent feature in most photo cameras and cannot be turned off in the Canon 80D. If your video requires a shooting time of more than 29 minutes, then you should consider our third camera option.
Canon XF705 4K Camcorder
The Canon XF705 4K Camcorder will provide you hours of recording time depending upon the size of the SD card you are using. This camera will also provide you with a variety of recording format options including the H265 codec. The camera includes an integrated zoom lens, an internal microphone, and two XLR inputs for two additional external microphones to optimize your audio recording. The camera kit includes a remote control. The remote control includes a zoom control to adjust the focal length of the lens. This will prove most helpful for framing yourself in the image since you will not be able to reach the zoom control on the camera. The remote control also includes a Record Start/Stop button so that you can remain in the frame and begin recording. This camera also includes multiple mounting options for a variety of accessories to add even more production value to your image.
Equipment List for Each Self Recording Option
Smartphone
- Lightning to 3.5mm Adapter Cable (if you’re using a newer iPhone)
- Rode Wireless GO Microphone Kit
- 3.5mm TRS to 3.5mm TRRS Cable (Included in our Rode Wireless GO Microphone Kit)
- Impact Lightweight Stand
- JOBY GripTight PRO Smartphone Mount
- Clip-on LED Ring for Smartphone
Your smartphone may need an adapter cable to work with the Rode Wireless Go Microphone Kit. For example, if it is a newer iPhone, then it may need a Lightning to 3.5mm Adapter Cable. Check the input on your phone. If your phone has a TRRS input, then the Rode Wireless Go Microphone Kit will include everything you need to record higher quality audio with your phone. Otherwise, you will need an adapter cable to connect the Rode receiver to your phone. The Rode receiver and transmitter will automatically pair and automatically looks for an available frequency once you power them on. The transmitter includes an integrated microphone and an input to attach an external microphone. Some of our Impact Lightweight Stands includes a threaded ¼-20 mount to secure the JOBY GripTight PRO Smartphone Mount. The Clip-on LED Ring is an inexpensive lighting option that will attach directly to your smartphone.
Canon 80D
- Canon EOS 80D Body Kit
- Sachtler Ace Tripod Kit
- Canon LP-E6 Battery (we include two in our camera kit)
- Canon EF 16-35mm f/2.8L II
- Rode Video Mic Pro
The Sachtler Ace Tripod Kit is our most affordable tripod; however, it does sacrifice its robustness for cost. It’s maximum weight capacity is 17.6 lbs, which is more than enough to support the Canon 80D. A Canon LP-E6 battery will give you about 2 hours of recording time, which will be approximately four 29 minute shooting intervals when using with the Canon 80D. The Canon EF 16-35mm f/2.8L II will provide you with a range of Field of View options for framing yourself and the background. The Rode Video Mic Pro will mount to the top of the camera, and plug directly into the camera for higher quality, directional audio recording. The microphone requires a 9V battery to power, which we do not include with the microphone.
Canon XF705
- Canon XF705 4K Camcorder Kit
- Manfrotto 504HD Tripod Kit
- SmallHD 702 Bright Monitor Kit
- Cold Shoe Mount (included in our monitor kits)
- ¼-20 female adapter (NOT included in our monitor kits. Ask a rental coordinator about this item.)
- Pearstone 8.3″ Articulating Arm
- SDI Cable (BNC Male to Male) – 3ft (included in our monitor kits)
- Sennheiser MKE 600 Shotgun Mic
- Sennheiser Wireless Lav Kit
- F&V Z180S Bi-Color LED Kit
- Noga Cine Arm
A larger camera and heavier accessories requires a more robust support solution; therefore. we recommend the Manfrotto 504HD Tripod Kit. The camera’s LCD monitor does not display camera settings when flipped to face the subject, so we recommend renting a monitor that can receive and display camera information. The SmallHD 702 Monitor will do this, and it also has a larger screen and higher resolution for reference, which will assist with the exposure of your image. In order to mount multiple accessories to the camera, you will need the appropriate hardware. Be sure to confirm which pieces of hardware are included in the kits, and those that need to be rented separately. View the list of included items on each kit’s item page on our website. The Canon XF705 includes a built-in microphone, but for higher quality, and versatility, we recommend renting a shogun mic and a wireless lavalier kit. The camera includes two XLR inputs to accommodate two external microphones. The F&V Z180S Bi-Color LED Kit is another versatile accessory that provides a more intense light that is dimmable and color temperature adjustable.
How do we setup each self recording option?
Smartphone (01:57)
- Thread JOBY GripTight PRO Smartphone Mount to the Impact Light Stand.
- Mount and secure your Smartphone horizontally in the mount for a wide frame. You may also adjust the mount and fluid head to vertically position your smartphone for a vertical video.
- Plug the Rode receiver into your Smartphone.
- Wrap the Rode receiver cable to one of the stand’s thumb knobs and clip the Rode receiver to the cable.
- Attach the Rode transmitter to your shirt.
- Power on the Rode Receiver and Transmitter and allow them to pair.
- Attach the Clip-on LED Ring and turn it on.
- Use top stage of the stand to adjust the pan and height of your Smartphone for framing.
- Step into the frame and make adjustments as needed.
- Run a test recording to make sure your framing, exposure, and audio levels are to your liking.
Canon 80D (08:39)
- Stand up the Sachtler Ace Tripod
- Attach the tripod’s quick release plate to the bottom of the Canon 80D with the ¼-20 camera mounting screw.
- Insert a battery into the camera.
- Mount the camera to the tripod.
- Attach the Canon 16-35mm Zoom Lens to the camera.
- Insert a 9V Battery into the Rode Video Mic Pro. Be careful and first push the battery door UP to open the battery port on the mic.
- Mount the mic to the shoe on top of the camera.
- Connect the mic’s audio cable to the mic port on the side of the camera.
- Power on the camera.
- Power on the microphone.
- Turn on the “Face Detect Auto Focus” in the camera’s menu settings.
- Set the camera’s audio settings to “Manual” in the menu settings.
- Check and adjust your audio levels with a set of headphones.
- Flip the camera’s LCD Monitor so that it will face you when recording.
- Pan and tilt the fluid head as needed to find your background frame.
- Adjust the focal length on the lens to adjust your background frame.
- Step into your frame and make adjustments as needed to finalize your frame.
- Switch control dial to “Program Auto” for the camera to automate exposure. Set the control dial to “M” to manually adjust exposure settings.
- Adjust exposure settings in the camera as needed.
- Test record your image to scrutinize it if necessary.
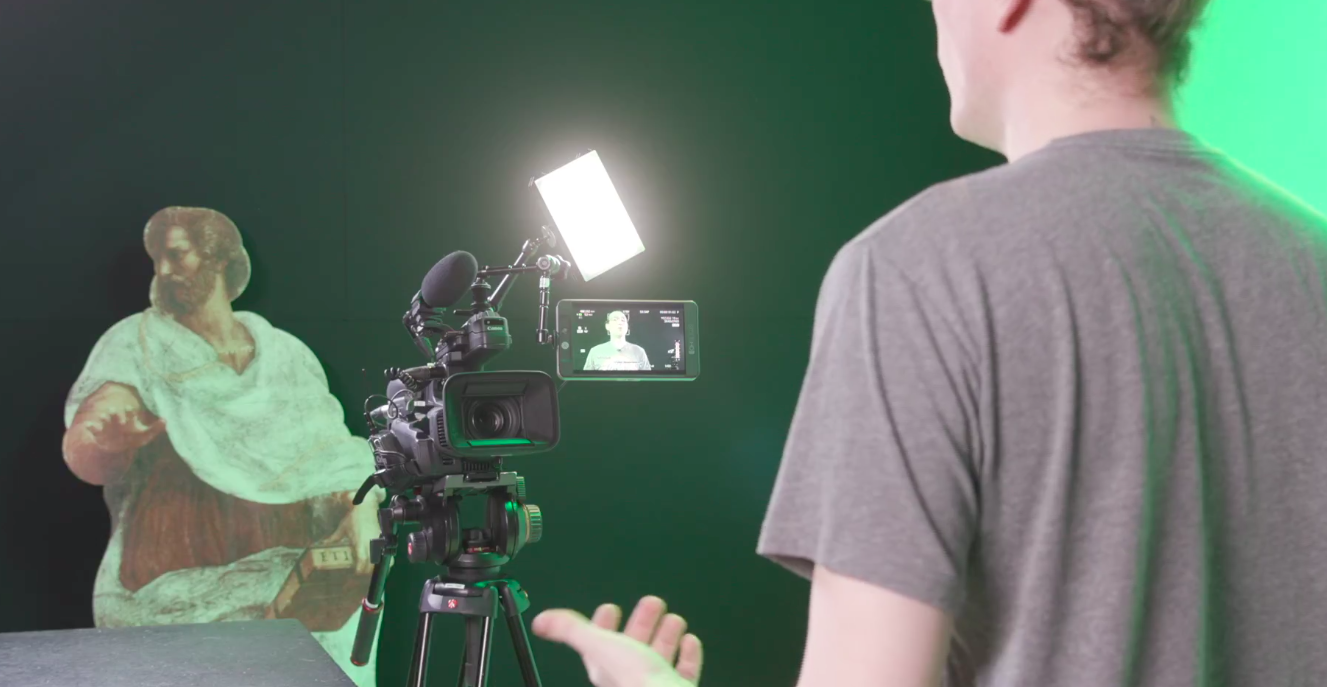
Canon XF705 (18:15)
- Stand up the Manfrotto 504HD Tripod
- Attach the tripod’s quick release plate to the bottom of the Canon XF705 with a ¼-20 camera mounting screw.
- Thread the ¼-20 female adapter to a cold shoe mount and attach it to the camera’s shoe.
- Thread an articulating arm to the ¼-20 female adapter.
- Thread the other end of the articulating arm to a side thread of the SmallHD 702 monitor.
- Position the monitor so that it faces the subject, but does not block the remote control sensor above the lens.
- Insert a battery into the camera.
- Insert a battery into the monitor.
- Connect the SDI cable to the camera output and monitor input.
- Secure the shotgun mic into the microphone shock mount on the camera.
- Connect an XLR cable to the back of the shotgun mic and the XLR 1 input on the camera.
- Remove the shoe mount from the Sennheiser Wireless Receiver
- Mount the receiver to the camera’s hand grip by wrapping its belt clip around the hand grip strap.
- Connect the XLR cable to the receiver, and the XLR 2 input on the camera.
- Attach the lavalier microphone to the Sennheiser Wireless Transmitter.
- Mount the transmitter to your belt, and the microphone to your shirt.
- Thread a second articulating arm to the rear thread on top of the camera, and the other end into the top of the F&V Z180S Bi-Color LED Light.
- Position the light as needed for your image frame.
- Power on the camera.
- Power on the monitor.
- Set the SDI output in the camera to output camera information settings.
- Set the monitor’s input to SDI.
- Power on your Sennheiser Wireless Receiver and Transmitter.
- Make sure phantom power (+48V) for the audio channel that is connected to the shotgun mic (XLR 2).
- Check and adjust your audio levels with a set of headphones.
- Pan and tilt the camera as needed to find your background frame.
- Step into your frame and use the zoom control on the remote control to frame yourself in the shot.
- Power on the LED Light.
- Test record yourself in the frame and make lighting and framing adjustments as needed.
- Dial the intensity dimmer and the color temperature knob on the LED light as needed.
- Adjust exposure settings in the camera as needed.
- Use the remote control to start recording.
Go to Magrents.com to build an order for your self recording video, or call a rental coordinator at 312-465-2366!
Want to start your own stream?
To watch all of our past live streams check out our Youtube Playlist.

0 Comments