
Vertical Video
What is a Vertical Video?
A vertical video is a video with a reversed aspect ratio. The larger, horizontal dimension becomes the vertical dimension, and what was previously the smaller, vertical dimension becomes the horizontal dimension. So, for example, instead of an image having a 16×9 aspect ratio, you will be creating an image with a 9×16 aspect ratio. The image is now taller than it is wide. A vertical video setup will rotate a camera 90 degrees to reverse the aspect ratio. Vertical video, or “vertical video framing” is also known as “portrait framing” or “shooting in portrait mode”.
Vertical imaging has been used for years in large format photography for banners and other outdoor advertisements that would scale buildings. Red Digital Cinema Cameras are a good choice for these applications due to their high resolutions. Framing video images vertically has increasingly become popular due to the aspect ratio of mobile devices like smartphones. One can see the popularity of vertical videos on Instagram or Facebook. Red cameras are excellent choices for social media applications due to their high speed frame rates at high resolutions. The Red Raven for example can record 120fps in 4K, 150fps in 3K, and 240fps in Full 2K.
What Equipment is Needed?
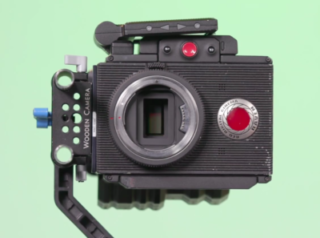
Our vertical video camera setup in this video includes a RED Raven and a Schneider Xenon 25mm Cinema Prime Lens along with some other camera support bits. These bits include a Redrock Micro Support Baseplate, a Redrock Micro 15mm Swing Away Arm, a Wooden Camera LW 15mm Top Mount, and four LW 15mm rods. We recommend using a lens with a wide focal length to make the vertical dimension, or height, as wide, or rather, as tall as possible.
How Does One Build a Vertical Video Camera Setup?
Mike first connects a Redrock Micro Baseplate with a 15mm rod clamp, and a pair of LW 15mm rods. He then attaches a Redrock Micro Swing Away arm to the rods. This effectively creates an “L-Bracket”. The Wooden Camera LW 15mm Top Mount is then attached to the top of the Red Raven. The second pair of LW 15mm rods is then attached to the other end of the swing away arm. The camera’s 15mm Top Mount then attaches to the second pair of rods This mounting setup rotates the camera 90 degrees to achieve the vertical video framing.
Mike recommends using Anton Bauer Cine 150 V Mount Batteries to power the camera. The Red Brick batteries included in the camera kit are tall and will block you from adjusting the camera position on the rods. Also, you might want to quickly move from a vertical video setup to another setup without powering down. The form factor of the Anton Bauer Cine 150 Batteries will allow you to make detailed adjustments, and dismount quickly for other setups.
Mike also recommends using our Arri MFF-2 Cine Follow Focus. This follow focus is easily adjustable and reaches a variety of heights. The vertical video setup places the lens mount of your camera, and therefore the lens, and the lens’s focus gears higher above the 15mm rods than normal. Because of this, not every follow focus will reach the lens gears. The Arri MFF-2 Follow Focus is great for engaging lens gears in camera builds with lens gears positioned higher than normal.
Mike then mounts a SmallHD 702 Bright Monitor to the bottom of the camera with a Noga Cine Arm. This monitor will display the vertical orientation of the image. The Red Touchscreen monitor can only be horizontally oriented; however, it is still needed to navigate camera menu settings. Mike then uses the SDI pass through function in the SmallHD monitor to pass the video signal to a Flanders Scientific 21” Production Monitor.
Build Your Own Variable ND Filter
Mike gets inventive and uses an Arri MMB-1 Matte Box and two polarizer filters to create a variable ND filter. He places a Tiffen 4×5.65 White Water Circular Polarizer in the front filter tray. Mike then places a Revar Cine 138mm Rotating Polarizer in the slot of the second filter tray. This filter tray is not used since the rotating polarizer has its own tray. With this setup, one can easily rotate the 138mm polarizer to adjust the ND level. This setup is especially helpful with Red cameras since they do not have built in ND.
To learn more about vertical video, check out Fstoppers.com‘s “Doing the Vertical Video Thing“.
If you would like to learn more about our Red Raven then watch our Red Raven Setup & Overview video. Want to start your own stream? Visit PerfectCircle.Pro or call Magnanimous at 312-465-2366.
0 Comments