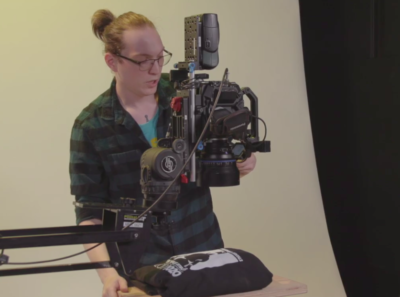
Top Down Shooting, what is it?
Top Down shooting is an overhead shooting method that lowers toward the subject. It is a complex shot that positions the front of the camera parallel to the ground, and then “pushes in” toward the ground.
What Equipment is Used in the Setup and Why?
We are using a Panasonic EVA1 5.7K S35 Cinema Camera with a Zeiss CP2 50mm Makro T2.1 Prime Lens mounted to a Kessler Pocket Jib to achieve a top down shooting style in this video.
The Panasonic EVA1 has an EF Mount, so it can be paired with Canon auto-focus lenses. Instead of using the EVA1’s auto focus function, we will control focus by using the ARRI SXU-1 Single Axis Lens Control Kit. We could choose to use a camera, like the Canon C200, which has better auto-focus, but the reason we are using the Panasonic EVA1 is because of its ability to record very sharp detail with its 5.7K sensor. Capturing sharp detail is important for the purpose of this top down shooting setup. This top down shooting setup applies very well to product shots, or food shots that require emphasis, or simply more detail. Also, the reason we are using the Zeiss 50mm Makro lens is because we are able to get very close to the product in the shot which increases are in-focus tilt range.
Other Equipment in this Setup
The camera is mounted directly to a Redrock Quick Release System. These are great for adjusting the height of the camera, and thus the height of the camera’s optical center relative the position of the 15mm rods. Making adjustments to the height of a camera’s optical center is important for accommodating a variety of accessories, and camera form factors.
The Redrock Quick Release System is then mounting to a Sachtler Video 20 S1 Fluid Head. This particular fluid head can hold up to 55lbs, and is very adjustable. It can be tilted 90 degrees which is required for this top down camera setup.
The camera setup also includes an Anton Bauer Gold Mount Battery Adapter, an Anton Bauer Multi PowerTap, and an Anton Bauer Digital 90 Battery. The Anton Bauer Gold Mount Battery Adapter is a Redrock Cheeseplate with an attached gold mount battery adapter that clamps to the 15mm rods connected to the Redrock Quick Release System. The Digital 90 Battery connected to the adapter, and attached to the Multi Power Tap to power the ARRI cforce mini RF Motor that engages the gears on the Zeiss 50mm Makro Lens.
We attach a SmallHD 702 Bright Monitor with a Noga Cine Arm to the end of the jib where the counterbalance weights are mounts. The monitor is connected to the camera with a 25ft SDI Cable. This allows the jib operator to see the subject when making his movements.
The monitor includes an SDI pass though port which allows us to connect the monitor to a Flanders Scientific LM-2140W 21″ Monitor with a second 25ft SDI Cable. The second monitor is perfect for the Camera Assistant who is pulling focus with the Arri SXU-1 Hand Unit, and a director to oversee the shot.
Process for Building this Setup
- Mount the jib to the Kessler K-Pod tripod
- Add the ball mount plate accessorry to the jib.
- Mount a fluid head to ball mount plate.
- Support the camera end of the jib.
- Build the camera setup on a separate tripod or hi-hat.
- Attach the fully built camera setup to the jib.
- Attach monitor to the end of the jib that secures the weights.
- Connect the monitor to the camera with an SDI Cable.
- Add weights until the camera end floats freely.
Primary Virtue
One of the virtues of using the Kessler Pocket Jib for top down shooting is that it provides additional movement options. A jib operator can tilt with the jib, but can also pan the camera over the subject. The Kessler Pocket Jib can reach a height of 83.5”, and a fully extended jib arm can reach a maximum of 76”. A collapsed arm will reach 45.5”.
Want to start your own stream? Visit PerfectCircle.Pro or call Magnanimous at 312-465-2366.


0 Comments